Making a Voice Assistant with Streamlit, ElevenLabs API, and SpeechRecognition
Chatbots don’t make much sound. Maybe a soft ding to attract your attention when a message comes. Or when they pop up, uninvited usually, in the corner of a web-page Clippy-style. It’s worth remembering that we can make our bots speak. While we can develop on platforms like Alexa or Mycroft, we can also develop our own voice assistants using the powerful technologies available. In this article, we’ll explore some of the tools to make a multilingual voice assistant.
ElevenLabs provides an API that makes it easy to integrate text-to-speech into your applications. In fact, they just released the second version of the multilingual API on August 22, 2023. This API supports many more languages than V1. Also, it automatically adjusts its spoken language based on what it detects as the language of the text. To get started with our tutorial, set up an account at https://elevenlabs.io.
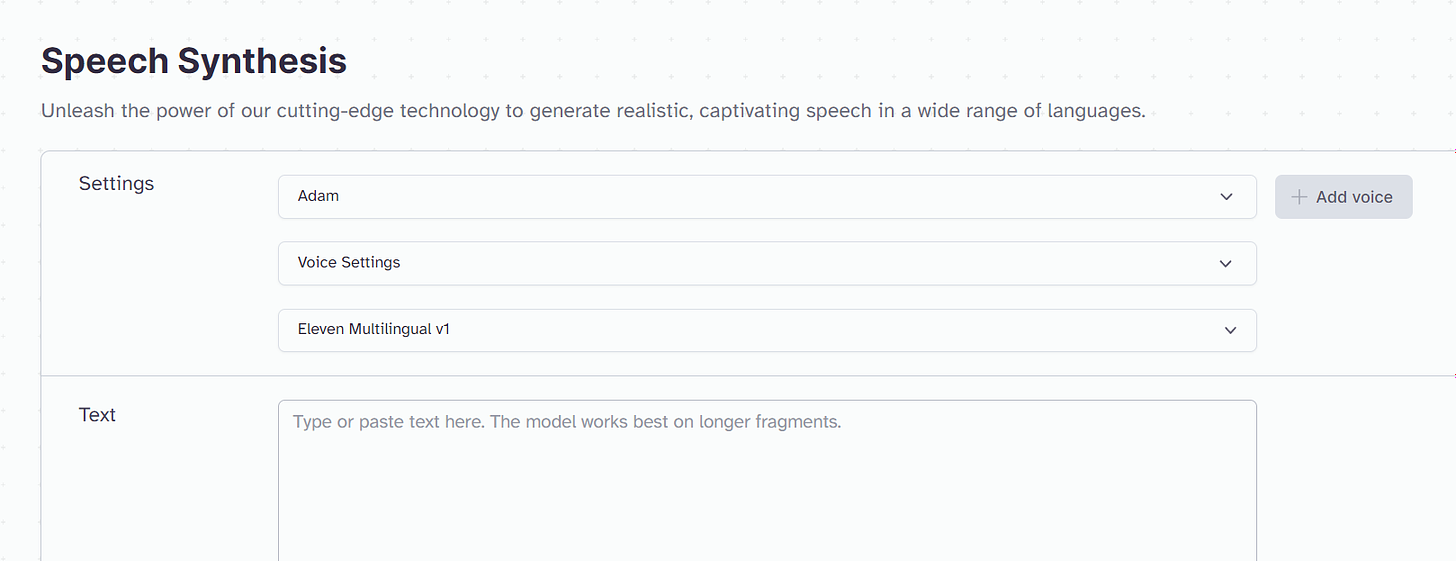
After you log in, you will see the Speech Synthesis page. This is a great place to start playing with the text-to-speech service to get a sense for how it works and sounds. You can select a voice, adjust the characteristics of the voice, and type text to turn to audio.
Each month, you are allotted 10,000 characters to play with. If you need more, you will need to pay for a subscription. To avoid using up your quota, you can just preview the different voices from the dropdown menu.
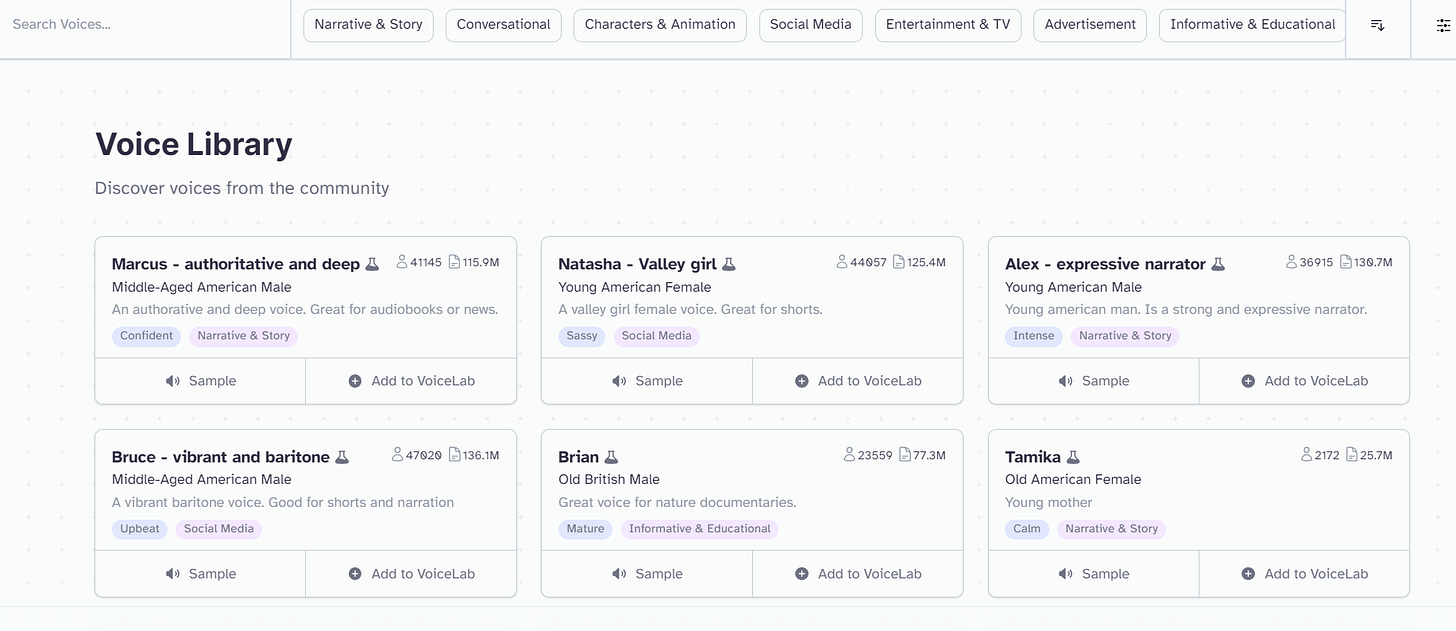
Click Voice Library at the top of the page. Community members have created many other voices that you can use. ElevenLabs offers a VoiceLab that allows you to adjust characteristics to craft the perfect voice for your project. It also offers the ability to record your own voice profile to create a voice you can use. Regardless, you can share these voice creations or use those from others.
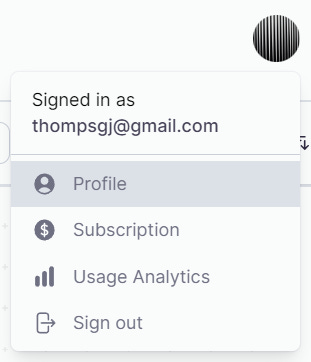
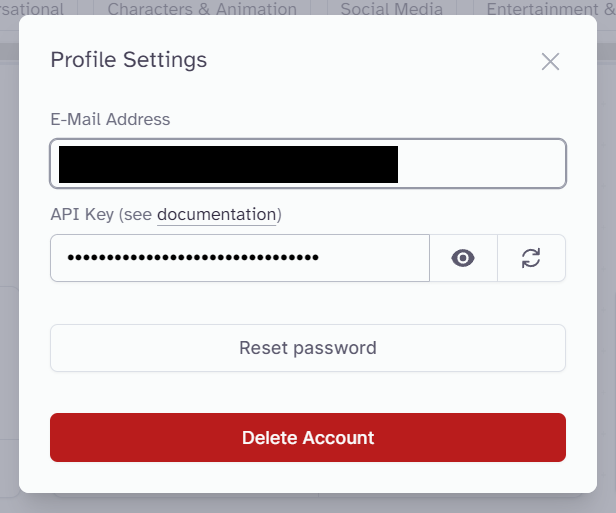
Now that we have quickly toured ElevenLabs’s capabilities. Let’s dive into our application. Before we leave this site, we need to get our API key. Click on your profile in the upper-right corner, and then click Profile.
You already have an API key available. Just copy it!
We’re going to work with Streamlit to build our bot. Streamlit offers a fast way to build applications using pure Python. It has a library of pre-made components that you can use to build dashboards, chatbots, and other applications. In fact, they have a great chatbot tutorial that uses their native chat components.
Unfortunately, because we are using both voice and text, we’re going to have to approach our bot a bit differently.
The way you install Streamlit depends on your system. Once you have set Streamlit up, you can type the following into your terminal and see the version.
>>> streamlit —version
Streamlit, version 1.26.0
First, let’s get our project file structure set up. The main folder will be called “voicebot”. Inside we’ll have a .streamlit folder that contains a secrets.toml. Then we’ll have our actual application inside voicebot.py
voicebot
├── .streamlit
│   └── secrets.toml
└── voicebot.py
Instead of an .env file, we’ll use the secrets.toml for sensitive information. We already have our key from ElevenLabs. Put that into .streamlit/secrets.toml. Go ahead and add your OpenAI API key, too. Those are the only secrets will use for this app.
ELEVEN_KEY=your-key-here
OPENAI_API_KEY=your-key-here
Now let’s install the elevenlabs Python package. This will enable us to interact with the API to access the voices and text-to-speech capabilities we previewed earlier.
pip install elevenlabsIn voicebot.py, let’s get our text-to-speech set up. At the top of the file, import the elevenlabs components and use the ELEVEN_KEY from earlier.
from elevenlabs import set_api_key
from elevenlabs import generate, play

ELEVEN_KEY = st.secrets["ELEVEN_KEY"]
set_api_key(ELEVEN_KEY)
Our audio output function will take in a text message and a voice name. It will then play the audio from your speakers. We’re using the v2 API so that we can respond with a wide variety of languages.
def stream_audio_response(input, voice="Bella"):
    audio = generate(
        text=input,
        voice=voice,
        model="eleven_multilingual_v2",
    )
    play(audio)
To test our function, we’ll add a button that calls the “stream_audio_response” with different test phrases. Since our main app is going to be a chat interface, we’ll create a sidebar to house this test button and some settings.
Streamlit has components that will help us do this quickly. To access Streamlit’s components, add the following import statement with the others at the top of your file.
import streamlit as stTo create our sidebar, we’ll use “with st.sidebar”. “with” groups nested components together. It can help you define sections in your user interface and generally keep your code organized. “st.sidebar” creates the actual container attached to the left side of the page. No CSS or HTML necessary on our part.
“if st.button” is nifty shorthand for creating a button and registering when someone clicks on it. In our case, when someone clicks on the button, we’ll play 5 test audio cases.
import streamlit as st

with st.sidebar:
    if st.button("Test Voice Output", type="primary"):
        stream_audio_response("This is a test")
        stream_audio_response("이것은 테스트입니다")
        stream_audio_response("The Korean word for cat is 고양이!")
        stream_audio_response("The Korean word for cat is")
        stream_audio_response("고양이!")
Let’s test it out! Run Streamlit, and then click the “Test Voice Output” button.
streamlit run voicebot.pyNotice how the multilingual voice API works. ElevenLabs automatically detected the language of each audio sample and converted the text to audio. Even though “Bella” was described as “American” on the ElevenLabs site, you can see that the voice still spoke Korean well.
The API seems to do pretty well even with sentences that include multiple languages, but there could be some awkward pronunciations. Breaking a multilingual message up improved the pronunciation, but then there is a significant pause between utterances.
Now it’s time to build our actual bot. Install the openai package with your terminal.
pip install openaiImport the openai package in voicebot.py. We’ll also need to add a reference to our OPEN_AI_KEY in the secrets.toml.
import openai

openai.api_key = st.secrets["OPENAI_API_KEY"]
Streamlit starts a session when a user opens your application. That session persists throughout the user’s time in the app. We can access this session to store important information. We store these values in the session_state object.
So we need to tell Streamlit to add “gpt-3.5-turbo” to our session state because that’s the model we’d like to use. It’s a bit unusual, though, because we are using an if-statement. It seems like we could just set that up at the beginning (ie., openai_model = gpt-3.5-turbo”). We use the if-statement because we don’t want to keep setting this value each time the app reruns to update the state. The session_state will remember the value after it is first set.
if "openai_model" not in st.session_state:
    st.session_state["openai_model"] = "gpt-3.5-turbo"
We’re going to do the same with our chatbot messages. Usually, a bot will display a running list of messages. We need Streamlit to preserve these in its session_state.
if "messages" not in st.session_state:
    st.session_state.messages = []
Now, we’re going to make our chatbot’s input field. This is where the user will type out their query to the LLM.
user_input_placeholder = st.empty()
user_input = user_input_placeholder.text_input("You:", value="")
Once a user has entered their input, we need to handle converting both the user message and the LLM response to chat messages in the session_state. We append a new message object to session_state.messages for both the “user” and “assistant” exchanges.
if user_input:
    # Add the user message to the session_state messages
    st.session_state.messages.append({"role": "user", "content": user_input})

    # Handle the LLM call
    with st.chat_message("assistant"):
        full_response = ""
        for response in openai.ChatCompletion.create(
            model=st.session_state["openai_model"],
            messages=[
                {"role": m["role"], "content": m["content"]}
                for m in st.session_state.messages
            ],
            stream=True,
        ):
            full_response += response.choices[0].delta.get("content", "")

        # Append the LLM response to the session_state messages
        st.session_state.messages.append(
            {"role": "assistant", "content": full_response}
        )

    # Add the messages to the application's frontend display
    for message in st.session_state.messages:
        with st.chat_message(message["role"]):
            st.markdown(message["content"])
Try it out. You can rerun the streamlit command if you closed the application, or you can click “Rerun” in the application.
streamlit run voicebot.pyYou may have noticed a slight UX problem. The messages all get appended to the bottom of the message list, meaning the most recent message gets further and further away from the input field. As the conversation goes on, the user would probably feel increasingly frustrated.
Let’s fix this. We’ll need to reverse the list so that the most recent messages are towards the top. But remember that each individual message is actually part of a pair (one turn of conversation), and we’d like the user message above the bot message. So after .reverse(), our second step is to swap the index of every two messages.
def flip_every_two_messages(messages):
    for i in range(0, len(messages) - 1, 2):
        messages[i], messages[i + 1] = messages[i + 1], messages[i]
    return messages


if user_input:
    st.session_state.messages.append({"role": "user", "content": user_input})

    with st.chat_message("assistant"):
        full_response = ""
        for response in openai.ChatCompletion.create(
            model=st.session_state["openai_model"],
            messages=[
                {"role": m["role"], "content": m["content"]}
                for m in st.session_state.messages
            ],
            stream=True,
        ):
            full_response += response.choices[0].delta.get("content", "")

        st.session_state.messages.append(
            {"role": "assistant", "content": full_response}
        )

    messages_copy = copy.deepcopy(st.session_state.messages)
    messages_copy.reverse()

    messages_copy = flip_every_two_messages(messages_copy)

    for message in messages_copy:
        with st.chat_message(message["role"]):
            st.markdown(message["content"])
Whew, we’ve got our chat working. Our users can type their questions into the input field, get a response from the LLM, and keep track of their discussion. Let’s add in our text-to-speech to let our users listen to the response instead of just read it. Also, let’s give our users the some control over this voice feature.
Back in our sidebar, we’ll add in some settings below the “Test Voice Output” button. Here we are setting up a toggle setting called “Spoken Results”, which is off by default. If a user activates that, we’ll add some more options! They can choose between American English or British English. They can also choose whether the agent is a man or woman - Daniel or Bella. Feel free to choose some other voice profiles.
with st.sidebar:
    # Test voice button

    enable_agent_voice = st.toggle("Spoken Results", value=False)
    if enable_agent_voice:
        voice_dialect_choice = st.radio(
            "Select language", ["American English", "British English"]
        )

        voice_agent_choice = st.radio("Agent Gender", ["Man", "Woman"])
        if voice_agent_choice == "Man":
            voice_agent = "Daniel"
        else:
            voice_agent = "Bella"
Now we need to add this to our bot’s logic for handling user input. We’ll put this right after the application appends the bot’s response to the session_state. If the user enables the voice agent, the LLM response will be read to them in the voice_agent of their choice. In Streamlit, you should hear the response to your input once you adjust the “voice agent” settings.
if user_input:
    # User message logic

    # OpenAI call

    # Response logic

    if enable_agent_voice:
        stream_audio_response(full_response, voice=voice_agent)

    for messages in messages_copy:
        with st.chat_message(message["role"]):
            st.markdown(message["content"])
Pretty neat… We have a bot that we can interact with. It will voice its response based on settings we control. Note, though, that these ElevenLab API calls do count towards the 10,000 monthly characters for a free account.
One thing we could do to improve the bot is allow our users to talk to the bot instead of just type their query. While ElevenLabs makes text-to-speech relatively easy, speech-to-text is a bit more involved. We will need to use other services. In our case, the SpeechRecognition package.
pip install SpeechRecognitionTo work with microphones, we’ll need to install the PyAudio package as well. Installation differs on which operating system you are using. Checkout the PyAudio page for the specific command(s) for your environment.
pip install pyaudioWith these dependencies installed in our environment, let’s incorporate SpeechRecognition into our app. Add the package to your other imports.
import speech_recognition as srWe’ll make a function to listen for microphone input and attempt to convert it. It’s worth understanding what SpeechRecognition is doing in this function. The Recognizer is just a class that helps recognize speech.
sr.Microphone allows you to choose the input device. SpeechRecognition has the capability to detect multiple input devices, so you can provide your user the opportunity to choose their device. For our purposes, though, we are just using the default microphone.
Then, we use a “try” block to attempt to convert the audio to text using another platform. SpeechRecognition supports various speech-to-text platforms, such as Google Cloud Speech API, Microsoft Azure Speech, Whisper API, Wit.ai, and others.
You may find it unusual that we haven’t entered an API key. SpeechRecognition comes with a default API key to Google Web Speech API. There’s no guarantee that this key will work, but at least during my testing it worked. You can swap out (or add) another platform if you’d like, but you will need to set up that platform, get a key, and add it to your application.
def handle_voice_input():
    r = sr.Recognizer()

    with sr.Microphone() as source:
        audio = r.listen(source, timeout=5)
    try:
        audio_text = r.recognize_google(audio)
        return audio_text
    except Exception as e:
    return None
Now let’s augment this function with Streamlit components. First, we’ll help our users understand how to use the application by letting them know what the speech recognition is doing — recording or completed. We don’t want those messages to persist. So we are putting them in a container and then emptying them after the voice input is finished processing.
def handle_voice_input():
    r = sr.Recognizer()

    container = st.empty()
    container.write("Recording started")
    with sr.Microphone() as source:
        audio = r.listen(source, timeout=5)
        container.write("Recording complete")

    try:
        audio_text = r.recognize_google(audio)
        container.empty()
        return audio_text
    except Exception as e:
        container.empty()
    return None
To give users control over voice input, we need to add a simple button that sets “voice search” to True.
with st.sidebar:
    # "Test Voice Output" button logic

    if st.button("Voice Search", key="voice_search"):
        enable_user_voice_search = True

    # "Spoken Results Enabled" logic
And finally… we have to adjust our input field to account for the possibility of voice input.
user_input_placeholder = st.empty()
if enable_user_voice_search:
    voice_input = handle_voice_input()
    user_input = user_input_placeholder.text_input("You:", value=voice_input)
else:
    user_input = user_input_placeholder.text_input("You:", value="")
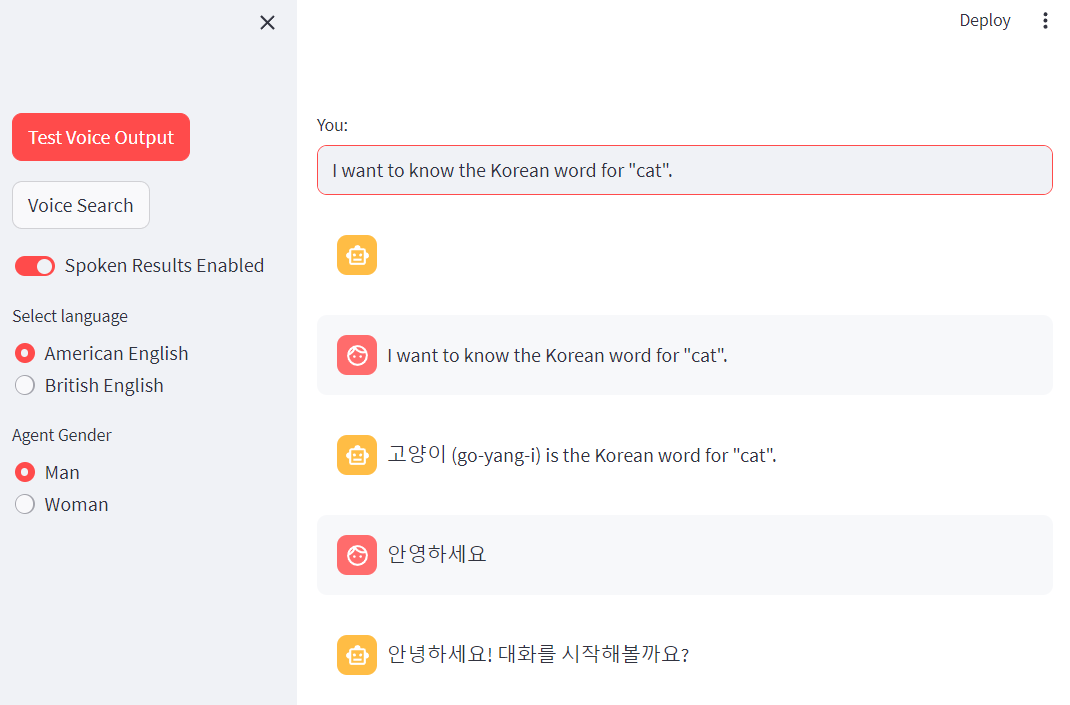
We now have a working multilingual voicebot.
There are some other things you could explore to improve this application.
You can see the random yellow robot square at the top of the message list. How might we adjust our user_input section to get rid of that?
Also, try doing a voice search without any microphone. How might we handle this more appropriately?
The ElevenLabs API documentation has other neat features that we could incorporate. How might we use different voice profiles? How might we stream both the text response and voice response together for a smoother chat appearance?
While LLMs have gotten a lot of attention, there are many tools and technologies that can support conversational AI interfaces and capabilities. Packages, like Whisper-JAX, continue to build upon these technologies. As these tools mature, we will be able to create more sophisticated bots faster. In this article, we’ve looked at Streamlit for quickly prototyping a web application, ElevenLabs for text-to-speech, and SpeechRecognition for speech-to-text. We not only incorporated these into the application, but further we allowed users to adjust these features to their own tastes. Voice assistants have their own unique challenges for designing and developing, but there are some powerful tools to help us from prototyping to production.
We don’t have a way to actually use the function in our app yet.


